By Gord Tulloch, published in the May/June issue of RASC Winnipeg Centre
Over the past couple of years, I’ve tried a few techniques for getting auto-guiding working on my Celestron C8 SCT on a Sirius EQ/G mount in my backyard observatory.
For those who may be unfamiliar with auto-guiding, it’s the process of locking onto a star and keeping it in exactly the same place in your image by sending very short pulses to the telescope mount as soon as it moves at all. Originally done by hand in the bad old days with reticle eyepieces and drive correctors, it became automatic using the SBIG ST4 auto-guider camera, which established the standard most telescopes still use today by providing an ST4 port on the mount. However, with many computer controlled mounts, the ST4 port isn’t required and software sends commands to the mount to move it to keep a guide star centred. In my case, I use the guiding software intrinsic to Kstars/EKOS to guide since it integrates well with the EKOS sequencer to slew, align, focus, and guide on any target I specify. The principal of an off-axis guider is to introduce a pickoff prism into the light cone from the telescope (hopefully in a spot that doesn’t cause a shadow to fall on the camera sensor) so it can see some stars and lock onto one of them.
Initially I tried an Orion Deluxe Off-Axis Guider for $80USD, mostly because I knew that my C8 with its long focal length (2032mm, or 1280 with a F/6.3 focal reducer which I generally have on the scope for DSO astrophotography) it would be difficult to get a guide scope of sufficient resolution to ensure that the stars in my shots remained round.
Unfortunately, the Orion unit did not work out well. The first unit I received was completely broken with the prism not even entering the light cone, and the adjustment screw frozen in place. Kudos to Orion that they just sent me a new one, not even requiring me to return the old one. However, I experienced all sorts of issues getting the second unit working well also, which I also attribute to some issue with the prism. So, I gave up on the Orion product as an all-round lemon.
Next I mounted a C90 Mak-Cass scope, which is F/15 so has a similar 1350mm focal length to my main scope, piggyback on the C8. I got a piggyback rail from Scopestuff that really didn’t work well as it didn’t include radius blocks for mounting on the C8 tube assembly. From now on I will only get this kind of gear from ADM – the dovetail I got from them for the C8 works flawlessly. The piggyback approach introduced all sorts of flexure in the system. As well, it appeared the mount was reaching its limits with this assembly, which although it was well within the rated weight capacity for the mount, was impacting tracking since it was a lot of weight being cantilevered off the main tube. So, between flexure and tracking issues, this solution was a bust.
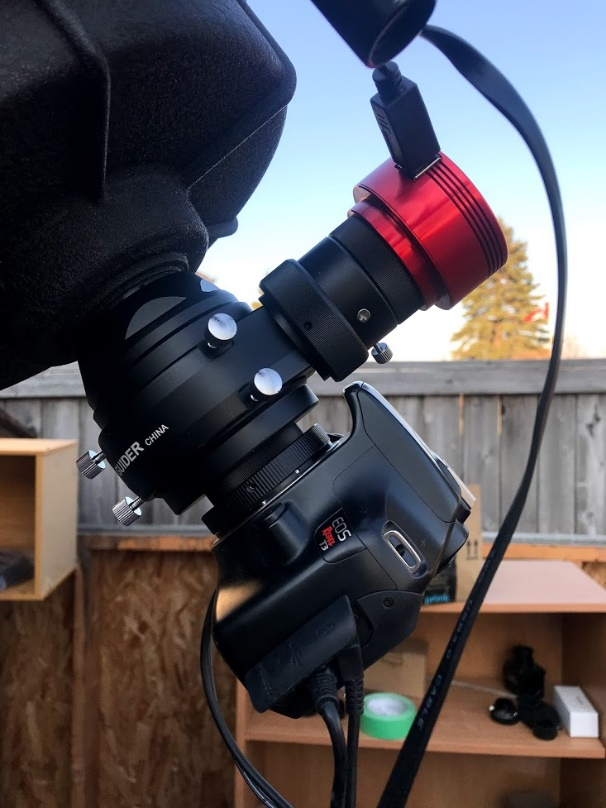
Finally, I decided to stop messing around and spend the cash to get a system that was reputed to be a robust and working solution – the Celestron Deluxe Off-Axis Guider from Ontario Telescopes for $409.49CDN landed cost.
After opening the box, it was clear that the Celestron product was much more robust than the Orion entry. As well, the long SCT Adapter and plate that came with the device solved a problem I had with the Orion OAG not clearing the JMI Motofocus focus motor on my C8. An OAG needs to be rotated occasionally since it may not have a guide star available in the field picked off by the internal prism.
Connecting my DLSR was easy – the first diagram in the manual was for this configuration, and all of the required pieces were included.

Diagram adapted from Celestron OAG93648 Manual
As you can see from the diagram, the OAG connects to the back threads on the SCT to the OAG then to a space onto which the T-T-Ring for my Canon DSLR threads. An additional short 5mm spacer is required to connect my Orion Starshoot guide camera, while a longer spacer (50mm) spacer is required for my ZWO ASI224MC. Since I’ll need the Starshoot guide camera for a second imaging system I’m working on bringing online, a 102mm refractor on my old CG5 mount, my (excellent!) ASI224MC planetary camera is doing double duty guiding my C8. I like having the ASI224MC attached to the scope rather than floating around my eyepiece box anyway!
The easiest way to focus the camera in an OAG is to get it close by aiming the telescope at a terrestrial object, then use the Looping function of the guide software (I have played around with both PHD2 and EKOS running on the Raspberry Pi 4 in my observatory) to take repeated images through the guide camera and allow me to easily focus on a bright star in the guide camera field. Once the guide camera and imaging camera are focused at the same point (“parfocal”) then when you have the imaging camera in focus the guide camera should be also. The very nice helical focuser on the Celestron OAG makes this tedious task as pleasant as possible.
Once my observatory was back up and running after the final cold snap in February, I had a chance to give the OAG a good workout and was very pleased by the results, although at this writing I still have some work to do to get guiding working consistently on my C8 to the degree that I can use the automation in EKOS to automatically acquire a guide star for targets in a sequence. Long focal lengths are great for taking pictures of galaxies, but kind of fussy when setting up for guiding, it appears.
While I’m consistently getting good stars in the OAG, generally not requiring me to rotate the unit around hunting for a guide star, I’m thinking of building a rotation device to make that automated since it’s a pain to have to run outside to do that while running the system from inside the house. There’s always another project on the horizon every time I get one finished!
So, overall, I’m very pleased, and kicking myself for wasting time and money on less expensive options that just plain don’t work!