For a few years I’ve been accumulating the bits required to create a much more portable setup for my venerable old CG5 mount. This mount was purchased in about 2002 along with a Celestron 8” optical tube as a Celestron AS/GT setup, which was a full GOTO system that worked extremely well in my observatory at the time. As kids came and time vanished, I sold off this mount to a local RASCal and went into a hiatus, getting a periodic fix of astronomy using iTelescopes to take some astrophotos.
Later, as the kids got old enough to be independent and my time started to free up, I ended up re-acquiring the CG5 but in the interim the electronics had failed and needed to be replaced. I sold off the components which paid for a MKS GEN-L board running OnStep[1] and motors to run the scope, which worked pretty well, but the packaging was quite cumbersome. So, I eventually scavenged the parts for other projects with the intent on making something very portable so I could take the CG5 to star parties and events.
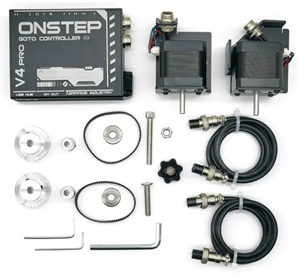
Years passed and not a lot got done – between my observatory and other projects I didn’t have a lot of time to spend integrating the pieces, despite purchasing them (mostly from AliExpress). So when I noticed that Terran Industry was offering a pre-assembled OnStep kit with a deluxe version that included 12v power ports (for dew heaters), ports for a focus and rotator motors, and an onboard USB hub for $182USD, I ordered one. The kit that arrived contained the parts in the image below – an OnStep controller, motors with brackets, GT2 gears and belts, some nice motor cables with aircraft connectors (much better than RJ12 connectors!) and some hex keys. A 3 foot USB cable for use between the controller and the computer is not shown, but is included.
I connected the motors to the controller (which they MUST be, don’t run the controller without the motors attached!) and plugged the USB cable into the Raspberry Pi 400 I use in my office for development. I fired up a Stellarmate image, configured it to use the OnStep LX200 driver, and within moments I had the motors happily slewing around. So, a good board. It’s noted that the board supports wireless and Bluetooth connections so I can connect to the controller wirelessly, which is excellent. By mounting a Raspberry Pi on the telescope, I can keep all the camera cables on the tube out of the way, with only a power cable going to the tube. Oh, and a focuser motor cable, I guess, since I want to use the OnStep focuser function as well. And since the controller supports a rotator I’ll have to make one of those too, but that’s a future enhancement.
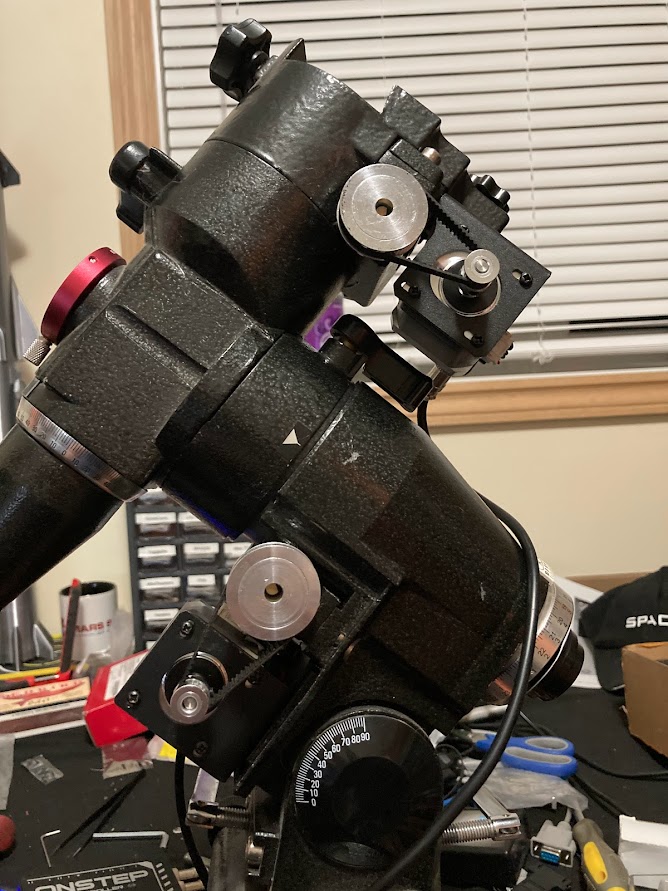
Installing the motors on the mount couldn’t be simpler – for the RA pass a bolt through the RA pivot axle housing and bolt the motor on with a supplied nut. For Dec even easier with a thumbwheel provided for the short bolt for the Dec axis. Loosen the motor to allow the belt to be put on, attach the 40 tooth GT2 gears to the RA and Dec worms, attach the belts and tighten the motors to tighten the belts. About a 10 minute job!
The Declination motor install was more problematic. In the video on the website it was shown that the installation was done via a thumbscrew into a threaded hole in the motor mount. What I received was a thumbwheel with a threaded insert and a bolt with a hex head I didn’t have a hex key for, plus the holes in the motor bracket were not threaded. I also wondered why, if the hole wasn’t threaded, there wasn’t a nut to hold the motor bracket on the mystery nut. Wait a minute, there is a nut, on the thumbwheel, aha! After some noodling, I realized if I removed the motor screws I could pass the mystery bolt through the motor mount hole, through the appropriate hole in the Dec housing, and secure it with the thumbwheel and a washer. It would be nicer if the assembly was consistent with the video (since there’s otherwise zero documentation for the assembly) but the problem was surmountable.
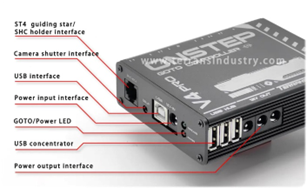
The two images below from the Terran website show the ports on the controller. The motors connect to the controller via a pair of very robust screw on aircraft connectors, which is great since they will get the most wear and tear with the moving mount. An ST4 port for guiding and a camera shutter port won’t get any use by me but may be attractive options for some users.
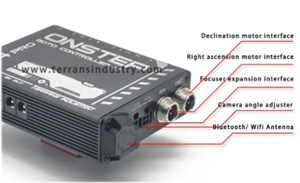
I asked the vendor via chat what connector I needed to connect a focus motor to the controller, and what the pinout was. I’m sure I could figure it out from the OnStep Wiki (which is extremely rich with information) or on the OnStep mailing list (also very information-dense!) but I figured I’d test the support chat.
Operationally, well, this is OnStep so it works very well. I often chuckle at projects on CloudyNights where the person has decided to create yet another DIY altaz or equatorial drive system. They have a looong road ahead of them to duplicate the functionality of OnStep!
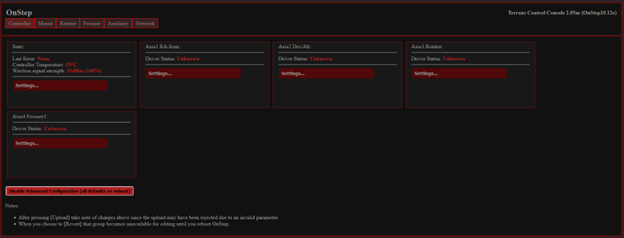
There are a few interfaces to the software. Connecting to the TerransOnStep wifi network allows you to connect to a web interface at http://192.168.0.1. You can reconfigure this network to join your local wifi network at home if you like, and it’ll re-enable the wifi hotspot mode if it can’t connect to that network if you’re away from home. The web interface allows you to edit the configuration of the controller (Config.H in OnStep parliance) but you need to know what you’re doing! The web interface can also be used to slew the telescope, do alignments, run the focus and rotator motors, and pretty much everything an OnStep controller can do. See the web interface below.
OnStep emulates an LX200 telescope via Serial (USB) or Wireless (192.168.0.1:9999 if connected to the TerransOnStep SSID) so you can connect to it from pretty much any popular telescope control system. I use it from KStars/EKOS on Linux microcontrollers like the Raspberry Pi or ODROID C4. I also tried using Sky Safari Pro and it worked just fine, although for some reason it took a few minutes to allow a connection.
Overall I’m excited to get this unit out under the stars and give it a workout using my 102mm achro and Stellarmate on an ODROID C4. My old CG5 has new life and it looks like it’ll work really well! Once I got it a workout (and hear back from the vendor, two days and counting) I’ll dive into the internals of the controller and see how I can add focuser and rotator, as well as control the 12v ports.
[1] OnStep was developed by Howard Dutton, more info at: https://onstep.groups.io/g/main
Thanks Gord! I recently messed up my advanced cg5 and been upset for a while, but when I can still do something to repair it, I find there are two ways, replacing boards and using onstep to repair it, and you are explaining the onstep rebuilding very clearly. I’m just confused about the onstep v4 kit you mentioned, there are two versions, eq3d and exos-2 kits available, which one did you use to do the repair? And are there other small items I need to prepare separately other than the toolkit itself? Thanks!
The EXOS-2 Kit works for any Super Polaris type mount like the CG5. Other than basic tools like screwdrivers there’s nothing else you need to install the kit.