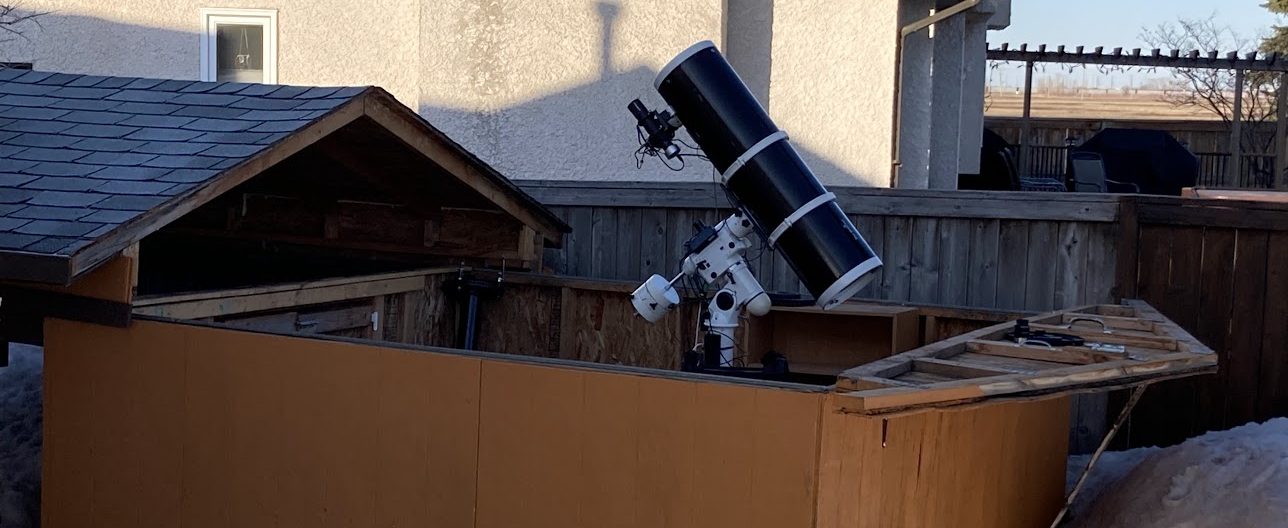
I was fortunate enough in November 2021 to happen upon a fantastic deal ($900CDN) on a used 10” F/4.7 (254mm/1200mm) reflector on a Skywatcher NEQ6 Pro mount (see below). This scope needs some changes to lighten the load– beefy as this mount is, as is the steel optical tube assembly (OTA) and accessories are probably a bit over the capacity limit of the mount for astrophotography, 18kg.

The tube itself is nearly 15kg so the additional long focus refractor guide scope, dovetail and rings push the OTA weight over the limit. As well the nice 60mm finder scope can go, to be replaced by an autoguider. The anticipated imager for this scope is a cooled ZWO ASI183MM and ZWO filter wheel. However, word is that the NEQ6 Pro is capable of good tracking even a bit over the limit. After-market mods are available as well to improve the mount, but most people seem to be happy with the base mount.
One note for anyone looking at used telescopes – bring your own 12v battery! The folks who were selling this unit (sadly as an estate sale) weren’t having much luck getting the mount going as they were trying to run it with a 500mA power supply. Telescope mounts need a lot of power, so I brought along my 12A Nautilus power bank (also in the picture above) which had the mount happily slewing the scope at its rated 3.4°/sec – you’re going to want to duck if this thing is headed your way!
As always, the telescope needs to be set up with my normal toolset, which is a Raspberry Pi 4 with the Stellarmate (Linux) operating system (OS). Stellarmate takes a bunch of open-source software written for the LINUX/Raspberry Pi platform and integrates it nicely, as well as providing updates automatically. The product ($65USD) is very similar to the ASI Air, except it supports a vastly wider range of hardware.
So, what does a Roboscope provide? A completely computer-controlled scope that self-aligns (requiring GPS and plate solving), auto-focuses (requiring a motor-driven focuser), auto guides (requiring a guide scope and camera) and can be programmed easily to perform a set of operations set by the user autonomously. Obviously, a lot of this is about software, but since the Stellarmate OS includes the INDI server along with KStars/EKOS, that’s more than covered.
To control the mount one more item was required – an EQMOD cable that replaces the normal Skywatcher Synscan handpad. This kind of setup is much more reliable than connecting to the handpad directly, and works well on my HEQ5 mount in the observatory so I ordered one from Amazon ($39.99).

I installed a brand-new version of Stellarmate OS 2.4.2 onto a 250GB solid state drive using the Raspberry Pi imaging software on a Windows computer – this basically copies a disk image downloaded from Stellarmate.com onto a large capacity, superfast, but tiny hard disk. You can then tell your Raspberry Pi to boot from this drive, avoiding the normal microSD cards that have proven to be unreliable. I’ve lost entire weekends of observing to bad cards so I’m happy with this kind of installation – much, much faster as well as more reliable with lots of capacity to store images.
GPS is provided by a cheap USB GPS “dongle” that magnetically attaches to the tube of the telescope. It not only provides accurate location information to the Raspberry Pi but sets the time properly too. I did have to modify a file in Stellarmate to support the particular model I have, but most GPS dongles are supported right out of the box.
Also installed on my iPad was the Stellarmate App, which has developed very quickly over the last few years to become a really nice alternative to using Stellarmate as a remote desktop application or by connecting from a Windows computer. It supports live stacking for EAA as well. However, to use the full capabilities of KStars/EKOS, particularly to queue observations up for the Roboscope to execute, you need to connect to the Raspberry Pi via remote desktop. Fortunately, the app also does that!

Since I really didn’t want to stand outside in the back yard within wireless range of the RPi in sub-zero weather, I cheated a bit and connected the setup to my home network using an AC extension cord and a Powerline Ethernet box, which hard cables the Raspberry Pi to my home network so I can sit inside and control the telescope. In the field I will connect my tablet or laptop to the wireless network the Stellarmate produces to start everything up and power it with my big Nautilus power bank.

The mount configuration is set to connect to the mount via the EQMOD cable and run a Shoestring Astronomy FSUSB focus motor controller – the actual motor is an Orion Accufocus ($130US) which I had on my 16” scope that wasn’t needed for the moment. The AccuFocus included a shaft coupler and bracket that seemed to be made specifically for the 250P single speed focuser, as connecting it required no adaptation at all, just some longer bolts to bolt the adapter plate to the focuser. This motor spins the focuser knobs under computer control but still has enough “slip” that the user can also focus manually. Generally I’ve found that autofocus doesn’t work well unless the telescope is pretty close to focus already so I look through an eyepiece to do a rough focus with the knobs and the computer can take over from there. The pictured handpad is replaced with the Shoestring FCUSB.

Mounting the Raspberry Pi and SSD drive to the mount was a matter of some judicious application of velcro. The SSD drive is similarly velcroed to the top of the RPi and it’s USB3 cable connected to the RPi. Also connected to the second USB3 port on the RPi is a 10 port USB hub that not only connects devices to the RPi but also provides power through the two black “charging” ports at the top of the unit. Normally a USB port provides 500mA of current but for the RPi, SSD, and especially the focus motor system that won’t cut it, and might crash everything while the focus motor is activated. The charging ports provide 2.4A which should be enough. Sometimes I feel like the NASA engineers working on the recovery of the Apollo 13 command module by accounting for every amp of juice being consumed by the lunar module for startup – in this case figuring out what the telescope mount needs to make sure it’s not underpowered, which would cause the mount to track poorly or causing the computer to crash.

For autoguiding I pulled the 50mm Starfield guide scope and rings from my 102mm refractor in the observatory and attached an Orion Starshoot Auto Guider (SSAG) to the OTA to replace the stock finder scope. This guide scope has a wide field of view but with a 216mm focal length, this scope is within the 10:1 rule of thumb as relates to the ratio between the focal length of the guide scope versus the main scope. A wide field of view makes it easy for the auto-guiding software to select a start to guide on, but not so wide that the star can move enough before a correction occurs to be visible in the main telescope camera. With plate solving in EKOS there’s no need for a finder of any kind although I can swap the finder back in since the OTA has a quick connect shoe that fits either device. The camera and guide scope hang down below the OTA for everything to balance correctly.

As you can see I also attached a Polar Alignment Camera to the mount so I can polar align it using the QHY software on the RPi. With everything ready to go, I’m ready to run a cable out to the other side of my fence, drop the unit in the snow, quickly polar align using the iPad, and head indoors. Now for some clear skies!
UPDATE: It turned out first light of this rig had to wait til Spring – the amount of snow was prodigious this year! Here’s the first image produced by this setup, a galaxy M94 in the constellation Canes Venatici. This object will be a challenge, it has a very bright nucleous and faint outer arms with a very faint halo around it. I’m looking forward to gathering more data on this object soon!
